Workflow Config Guide
Understanding Cyoda JSON workflow configurations.
Overview
Section titled “Overview”Cyoda workflows define finite, distributed state machines that govern the lifecycle of business entities in an event-driven environment. Each entity progresses through a sequence of states based on defined transitions, criteria, and processing rules.
The platform supports adaptable entity modeling, allowing business logic to evolve through configuration rather than implementation changes. Workflows declare the set of states, valid transitions, and associated processing steps while preserving immutable persistence for auditability.
Workflow Architecture
Section titled “Workflow Architecture”Core Components
Section titled “Core Components”- States: Lifecycle stages of an entity
- Transitions: Directed changes between states
- Criteria: Conditional logic for transition eligibility
- Processors: Executable logic triggered during transitions
Configuration Schema
Section titled “Configuration Schema”You can find the workflow schema in the API Documentation. See the workflow import endpoints for complete schema specifications. Here we explain the structure and meaning of each element.
Workflow Object
Section titled “Workflow Object”{ "version": "1.0", "name": "Workflow Name", "desc": "Workflow description", "initialState": "StateName", "active": true, "criterion": {}, "states": {}}Attributes
Section titled “Attributes”version: Workflow schema versionname: Identifier for the workflow. Must be unique per entity model.desc: Detailed description of the workflowinitialState: Starting point for new entitiesactive: Indicates whether the workflow is activecriterion: Optional criterion for selecting which workflow applies to a given entity. Uses the same condition types as transition criteria (simple, group, function). When multiple workflows are defined for a model, the platform evaluates each workflow’s criterion against the entity to determine which workflow governs it.states: Map of state names to state definitions
Multiple Workflows per Model
Section titled “Multiple Workflows per Model”An entity model can have multiple workflows, each with its own criterion at the workflow level. When an entity is created, the platform evaluates each active workflow’s criterion to select the applicable workflow. This allows different processing paths for different categories of entities within the same model.
Import and Export
Section titled “Import and Export”Workflows are managed via the import and export API endpoints:
- Export:
GET /model/{entityName}/{modelVersion}/workflow/export— returns all workflows for an entity model - Import:
POST /model/{entityName}/{modelVersion}/workflow/import— creates or updates workflows
Import Modes
Section titled “Import Modes”The import request includes an importMode field that controls how existing workflows are handled:
MERGE(default): Incremental update. Workflows with matching names are updated; unspecified workflows remain unchanged.REPLACE: Removes all existing workflows for the entity model and retains only the imported ones. Also deletes all unused processors and criteria.ACTIVATE: Similar to REPLACE, but deactivates (rather than deletes) existing workflows and transitions not included in the import. Unused processors and criteria are preserved.
Import Request Format
Section titled “Import Request Format”{ "importMode": "MERGE", "workflows": [ { "version": "1.0", "name": "Workflow Name", "initialState": "StateName", "active": true, "states": { } } ]}Export Response Format
Section titled “Export Response Format”{ "entityName": "Customer", "modelVersion": 1, "workflows": [ { "version": "1.0", "name": "Workflow Name", "initialState": "StateName", "active": true, "states": { } } ]}States
Section titled “States”States describe lifecycle phases for entities. Names must start with a letter and use only alphanumeric characters, underscores, or hyphens.
Format
Section titled “Format”"StateName": { "transitions": []}Special States
Section titled “Special States”- Initial state: The initial state of a new entity
- Terminal States: States with no outgoing transitions
Transitions
Section titled “Transitions”Transitions define allowed movements between states, optionally gated by conditions and supported by executable logic.
Format
Section titled “Format”{ "name": "TransitionName", "next": "TargetState", "manual": true, "disabled": false, "criterion": {}, "processors": []}Attributes
Section titled “Attributes”name: Name of the transition (required)next: Target state code (required)manual: Determines if the transition is manual or automated (required)disabled: Marks the transition as inactivecriterion: Optional condition for eligibilityprocessors: Optional processing steps
Manual vs Automated Transitions
Section titled “Manual vs Automated Transitions”Transitions may be either manual or automated, and are guarded by criteria that determine their eligibility. When an entity enters a new state, the first eligible automated transition is executed immediately within the same transaction. This continues recursively until no further automated transitions are applicable, resulting in a stable state. Each transition may trigger one or more attached processes, which can run synchronously or asynchronously, either within the current transaction or in a separate one. This forms the foundation for event flow automation, where processors may create or mutate entities in response, allowing a single transition to initiate a cascade of events and function executions across the system.
Criteria
Section titled “Criteria”Criteria define logic that determines if a transition is permitted. A criterion can be one of five types:
- Simple: Evaluates a single condition on entity data
- Group: Combines multiple criteria with logical operators
- Function: Calls an external function for evaluation (delegated to a calculation node via gRPC)
- Lifecycle: Evaluates a condition on entity lifecycle properties (state, creation date, previous transition)
- Array: Evaluates a condition against an array of values
Simple Criteria
Section titled “Simple Criteria”Simple criteria evaluate a single condition directly on entity data using JSONPath expressions. They are executed directly on the processing node, without involving external compute nodes.
"criterion": { "type": "simple", "jsonPath": "$.amount", "operation": "GREATER_THAN", "value": 1000}Simple Criteria Attributes
Section titled “Simple Criteria Attributes”jsonPath: JSONPath expression to extract the value from entity dataoperation: Comparison operator (see Operator Types below). Also accepts the aliasoperatorType.value: The value to compare against
Group Criteria
Section titled “Group Criteria”Group criteria combine multiple conditions using logical operators.
"criterion": { "type": "group", "operator": "AND", "conditions": [ { "type": "simple", "jsonPath": "$.status", "operation": "EQUALS", "value": "VALIDATED" }, { "type": "simple", "jsonPath": "$.amount", "operation": "GREATER_THAN", "value": 500 } ]}Group Criteria Attributes
Section titled “Group Criteria Attributes”operator: Logical operator combining conditions (AND,OR,NOT)conditions: Array of criteria (can besimple,function,group,lifecycle, orarraytypes — supports arbitrary nesting)
Function Criteria
Section titled “Function Criteria”Function criteria delegate evaluation to an external compute node via gRPC. The function must return a boolean result.
"criterion": { "type": "function", "function": { "name": "FunctionName", "config": { "attachEntity": true, "calculationNodesTags": "validation,data-quality", "responseTimeoutMs": 3000, "retryPolicy": "FIXED", "context": "optionalContext" }, "criterion": { "type": "simple", "jsonPath": "$.preCheckField", "operation": "EQUALS", "value": true } }}Function Attributes
Section titled “Function Attributes”name: The name of the function to execute (required)config: Configuration for the function call (optional):attachEntity: Whether to pass the entity data to the functioncalculationNodesTags: Comma-separated list of tags for routing to specific calculation nodesresponseTimeoutMs: Response timeout in millisecondsretryPolicy: Retry policy for the function (e.g.,"FIXED")context: Optional string parameter passed to the function for additional context or configuration. Thecontextis passed “as is” with the event to the compute node. It can contain any sort of information that is relevant to the function’s execution, in any format. The interpretation is up to the function itself.criterion: Optional quick-exit criterion evaluated locally before calling the (potentially expensive) external function. If this local criterion evaluates to false, the function call is skipped entirely. Useful for avoiding unnecessary network round-trips when the result can be confidently determined from entity data.
Lifecycle Criteria
Section titled “Lifecycle Criteria”Lifecycle criteria evaluate conditions on entity lifecycle properties rather than entity data.
"criterion": { "type": "lifecycle", "field": "state", "operation": "EQUALS", "value": "VALIDATED"}Lifecycle Criteria Attributes
Section titled “Lifecycle Criteria Attributes”field: Lifecycle field to evaluate:state,creationDate, orpreviousTransitionoperation: Comparison operatorvalue: The value to compare against
Array Criteria
Section titled “Array Criteria”Array criteria evaluate a condition against an array of values.
"criterion": { "type": "array", "jsonPath": "$.category", "operation": "EQUALS", "value": ["electronics", "software", "services"]}Array Criteria Attributes
Section titled “Array Criteria Attributes”jsonPath: JSONPath expression to the fieldoperation: Comparison operatorvalue: Array of string values to match against
Operator Types
Section titled “Operator Types”The following comparison operators are available for simple, lifecycle, and array criteria:
Basic Comparison: EQUALS, NOT_EQUAL, IS_NULL, NOT_NULL, GREATER_THAN, LESS_THAN, GREATER_OR_EQUAL, LESS_OR_EQUAL, BETWEEN, BETWEEN_INCLUSIVE
String Operations (Case-Sensitive): CONTAINS, NOT_CONTAINS, STARTS_WITH, NOT_STARTS_WITH, ENDS_WITH, NOT_ENDS_WITH, MATCHES_PATTERN, LIKE
Case-Insensitive String Operations: IEQUALS, INOT_EQUAL, ICONTAINS, INOT_CONTAINS, ISTARTS_WITH, INOT_STARTS_WITH, IENDS_WITH, INOT_ENDS_WITH
State Tracking: IS_UNCHANGED, IS_CHANGED
Processors
Section titled “Processors”Processors implement custom logic to run during transitions. There are two types of processors: externalized (delegated to calculation nodes) and scheduled (delayed transitions).
Externalized Processors
Section titled “Externalized Processors”Externalized processors delegate execution to a calculation node via gRPC. This is the most common processor type.
{ "type": "externalized", "name": "ProcessorName", "executionMode": "SYNC", "config": { "attachEntity": true, "calculationNodesTags": "tag1,tag2", "responseTimeoutMs": 5000, "retryPolicy": "FIXED", "context": "optionalContext" }}Externalized Processor Attributes
Section titled “Externalized Processor Attributes”type:"externalized"(discriminator)name: Name of the processor (required)executionMode: Execution mode (see below). Default:ASYNC_NEW_TX.config: Configuration for the processor call:attachEntity: Whether to attach entity data to the processor call. Set totrueif the processor needs access to the entity data (this is usually the case).calculationNodesTags: Comma-separated list of tags for routing to specific calculation nodesresponseTimeoutMs: Response timeout in millisecondsretryPolicy: Retry policy for the processorcontext: Additional context passed to the processorasyncResult: Whether to await the result asynchronously, outside of the transactioncrossoverToAsyncMs: Crossover delay in milliseconds to switch to asynchronous processing (effective only whenasyncResultis true)
Execution Modes
Section titled “Execution Modes”SYNC: Inline execution within the transaction. Runs immediately and blocks the current processing thread on the same node.ASYNC_SAME_TX: Deferred within the current transaction. Commits or rolls back atomically with the triggering transition.ASYNC_NEW_TX: Deferred execution in a separate, independent transaction. Default mode.
Synchronous executions run immediately and block the current processing thread on the same node, making them local and non-distributed. In contrast, asynchronous executions are scheduled for deferred processing and can be handled by any node in the cluster, enabling horizontal scalability and workload distribution, albeit with possibly somewhat higher latency.
Scheduled Transition Processors
Section titled “Scheduled Transition Processors”Scheduled processors trigger a delayed transition after a configured time period.
{ "type": "scheduled", "name": "schedule_timeout", "config": { "delayMs": 3600000, "transition": "timeout", "timeoutMs": 7200000 }}Scheduled Processor Attributes
Section titled “Scheduled Processor Attributes”type:"scheduled"(discriminator)name: Name of the processor (required)config(required):delayMs: Delay in milliseconds before executing the transition (required)transition: The name of the transition to execute after waiting (required)timeoutMs: Timeout in milliseconds for executing the transition task, after which it will be expired (optional)
Calculation Nodes Tags
Section titled “Calculation Nodes Tags”As described in the Architecture section, the execution of processors and criteria is delegated to client compute nodes, i.e. your own infrastructure running your business logic. These nodes can be organized into groups and tagged based on their roles or capabilities. By optionally setting the calculationNodesTags property in a processor or criterion definition, you can direct execution to specific groups, giving you fine-grained control over workload distribution across your compute environment.
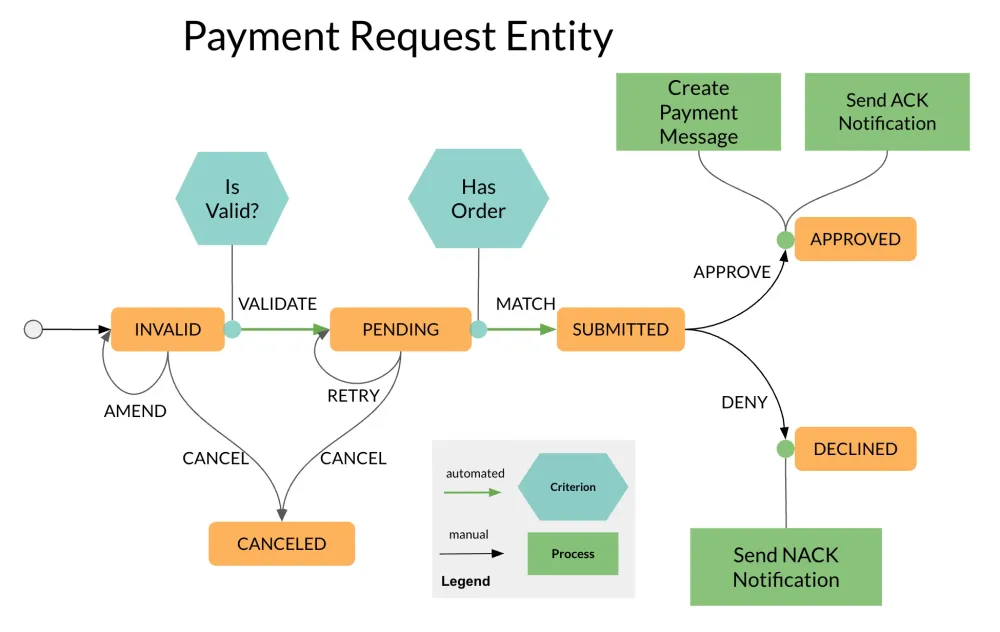
Example: Payment Request Workflow
Section titled “Example: Payment Request Workflow”This workflow models the lifecycle of a payment request, covering validation, matching, approval, and notification handling.
It starts in the INVALID state, where the request is either amended or validated. If validation succeeds and a matching order exists, the request advances automatically to the SUBMITTED state. If not, it moves to PENDING, where it awaits a matching order or may be retried manually. Requests in SUBMITTED require an approval decision, leading either to APPROVED, which triggers asynchronous processing like payment message creation and ACK notifications, or to DECLINED, which emits a rejection (NACK) notification. Manual amend and retry transitions at key stages allow users or systems to correct or re-evaluate the request.
The following section walks through the configuration step by step.
Step 1: Workflow Metadata
Section titled “Step 1: Workflow Metadata”{ "version": "1.0", "name": "Payment Request Workflow", "desc": "Payment request processing workflow with validation, approval, and notification states", "initialState": "INVALID", "active": true}Step 2: Define States and Transitions
Section titled “Step 2: Define States and Transitions”Start by defining the overall structure of states and transitions.
{ "version": "1.0", "name": "Payment Request Workflow", "desc": "Payment request processing workflow with validation, approval, and notification states", "initialState": "INVALID", "active": true, "states": { "INVALID": { "transitions": [ { "name": "VALIDATE", "next": "PENDING", "manual": false, "disabled": false }, { "name": "AMEND", "next": "INVALID", "manual": true, "disabled": false }, { "name": "CANCEL", "next": "CANCELED", "manual": true, "disabled": false } ] }, "PENDING": { "transitions": [ { "name": "MATCH", "next": "SUBMITTED", "manual": false, "disabled": false }, { "name": "RETRY", "next": "PENDING", "manual": true, "disabled": false }, { "name": "CANCEL", "next": "CANCELED", "manual": true, "disabled": false } ] }, "SUBMITTED": { "transitions": [ { "name": "APPROVE", "next": "APPROVED", "manual": true, "disabled": false }, { "name": "DENY", "next": "DECLINED", "manual": true, "disabled": false } ] }, "APPROVED": { "transitions": [] }, "DECLINED": { "transitions": [] }, "CANCELED": { "transitions": [] } }}Step 3: Add Criteria
Section titled “Step 3: Add Criteria”We add criteria to the VALIDATE and MATCH transitions:
{ "version": "1.0", "name": "Payment Request Workflow", "desc": "Payment request processing workflow with validation, approval, and notification states", "initialState": "INVALID", "active": true, "states": { "INVALID": { "transitions": [ { "name": "VALIDATE", "next": "PENDING", "manual": false, "disabled": false, "criterion": { "type": "function", "function": { "name": "IsValid", "config": { "attachEntity": true } } } }, { "name": "AMEND", "next": "INVALID", "manual": true, "disabled": false }, { "name": "CANCEL", "next": "CANCELED", "manual": true, "disabled": false } ] }, "PENDING": { "transitions": [ { "name": "MATCH", "next": "SUBMITTED", "manual": false, "disabled": false, "criterion": { "type": "function", "function": { "name": "HasOrder", "config": { "attachEntity": true } } } }, { "name": "RETRY", "next": "PENDING", "manual": true, "disabled": false }, { "name": "CANCEL", "next": "CANCELED", "manual": true, "disabled": false } ] }, "SUBMITTED": { "transitions": [ { "name": "APPROVE", "next": "APPROVED", "manual": true, "disabled": false }, { "name": "DENY", "next": "DECLINED", "manual": true, "disabled": false } ] }, "APPROVED": { "transitions": [] }, "DECLINED": { "transitions": [] }, "CANCELED": { "transitions": [] } }}Step 4: Add Processors
Section titled “Step 4: Add Processors”We add two processors to the APPROVE transition in the SUBMITTED state, respectively, to finish the job.
{ "version": "1.0", "name": "Payment Request Workflow", "desc": "Payment request processing workflow with validation, approval, and notification states", "initialState": "INVALID", "active": true, "states": { "INVALID": { "transitions": [ { "name": "VALIDATE", "next": "PENDING", "manual": false, "disabled": false, "criterion": { "type": "function", "function": { "name": "IsValid", "config": { "attachEntity": true } } } }, { "name": "AMEND", "next": "INVALID", "manual": true, "disabled": false }, { "name": "CANCEL", "next": "CANCELED", "manual": true, "disabled": false } ] }, "PENDING": { "transitions": [ { "name": "MATCH", "next": "SUBMITTED", "manual": false, "disabled": false, "criterion": { "type": "function", "function": { "name": "HasOrder", "config": { "attachEntity": true } } } }, { "name": "RETRY", "next": "PENDING", "manual": true, "disabled": false }, { "name": "CANCEL", "next": "CANCELED", "manual": true, "disabled": false } ] }, "SUBMITTED": { "transitions": [ { "name": "APPROVE", "next": "APPROVED", "manual": true, "disabled": false, "processors": [ { "type": "externalized", "name": "Create Payment Message", "executionMode": "ASYNC_NEW_TX", "config": { "attachEntity": true } }, { "type": "externalized", "name": "Send ACK Notification", "executionMode": "ASYNC_NEW_TX", "config": { "attachEntity": false } } ] }, { "name": "DENY", "next": "DECLINED", "manual": true, "disabled": false, "processors": [ { "type": "externalized", "name": "Send NACK Notification", "executionMode": "ASYNC_NEW_TX", "config": { "attachEntity": false } } ] } ] }, "APPROVED": { "transitions": [] }, "DECLINED": { "transitions": [] }, "CANCELED": { "transitions": [] } }}Best Practices
Section titled “Best Practices”- Use domain-specific state names
- Match transition granularity to business needs
- Define recovery and cancellation paths
- Prefer asynchronous processing for external dependencies
- Use self-transitions for triggering workflow automation on exit from the current state
Platform Integration
Section titled “Platform Integration”Cyoda workflows integrate directly with:
- Entity Models: Determine which workflows apply to which data types
- Execution Engine: Drives state and transition logic
- External Functions: Implement validation and custom behavior
- Event System: Triggers automated transitions on event reception